Showing posts with label Crafts. Show all posts

Monday, May 21, 2012

Side table make over!

Hello All! It has been a long and exhausting/boring unemployment. My first week off was so lovely, and the second week off: so productive. And since then, I have been suffering a bit from cabin fever. I don't know what to go explore and I get down in pit of lazy on most days.

But don't feel bad for me. I'm laying in bed typing this at 11am, watching The Price is Right.

Meanwhile, and the point to this post, is that I have finished a side table make over that I had planned as my unemployment project for this hiatus. 


Here was my inspiration:

via Pinterest

I love this color on an end table, along with all this detail, and matched with the mirror above. It feels very Mediterranean. I am starting to try to branch out and get in touch with my colorful side - as I tend to always veer toward earth tones - and what  better way to do that than pull things from my Mediterranean heritage!?

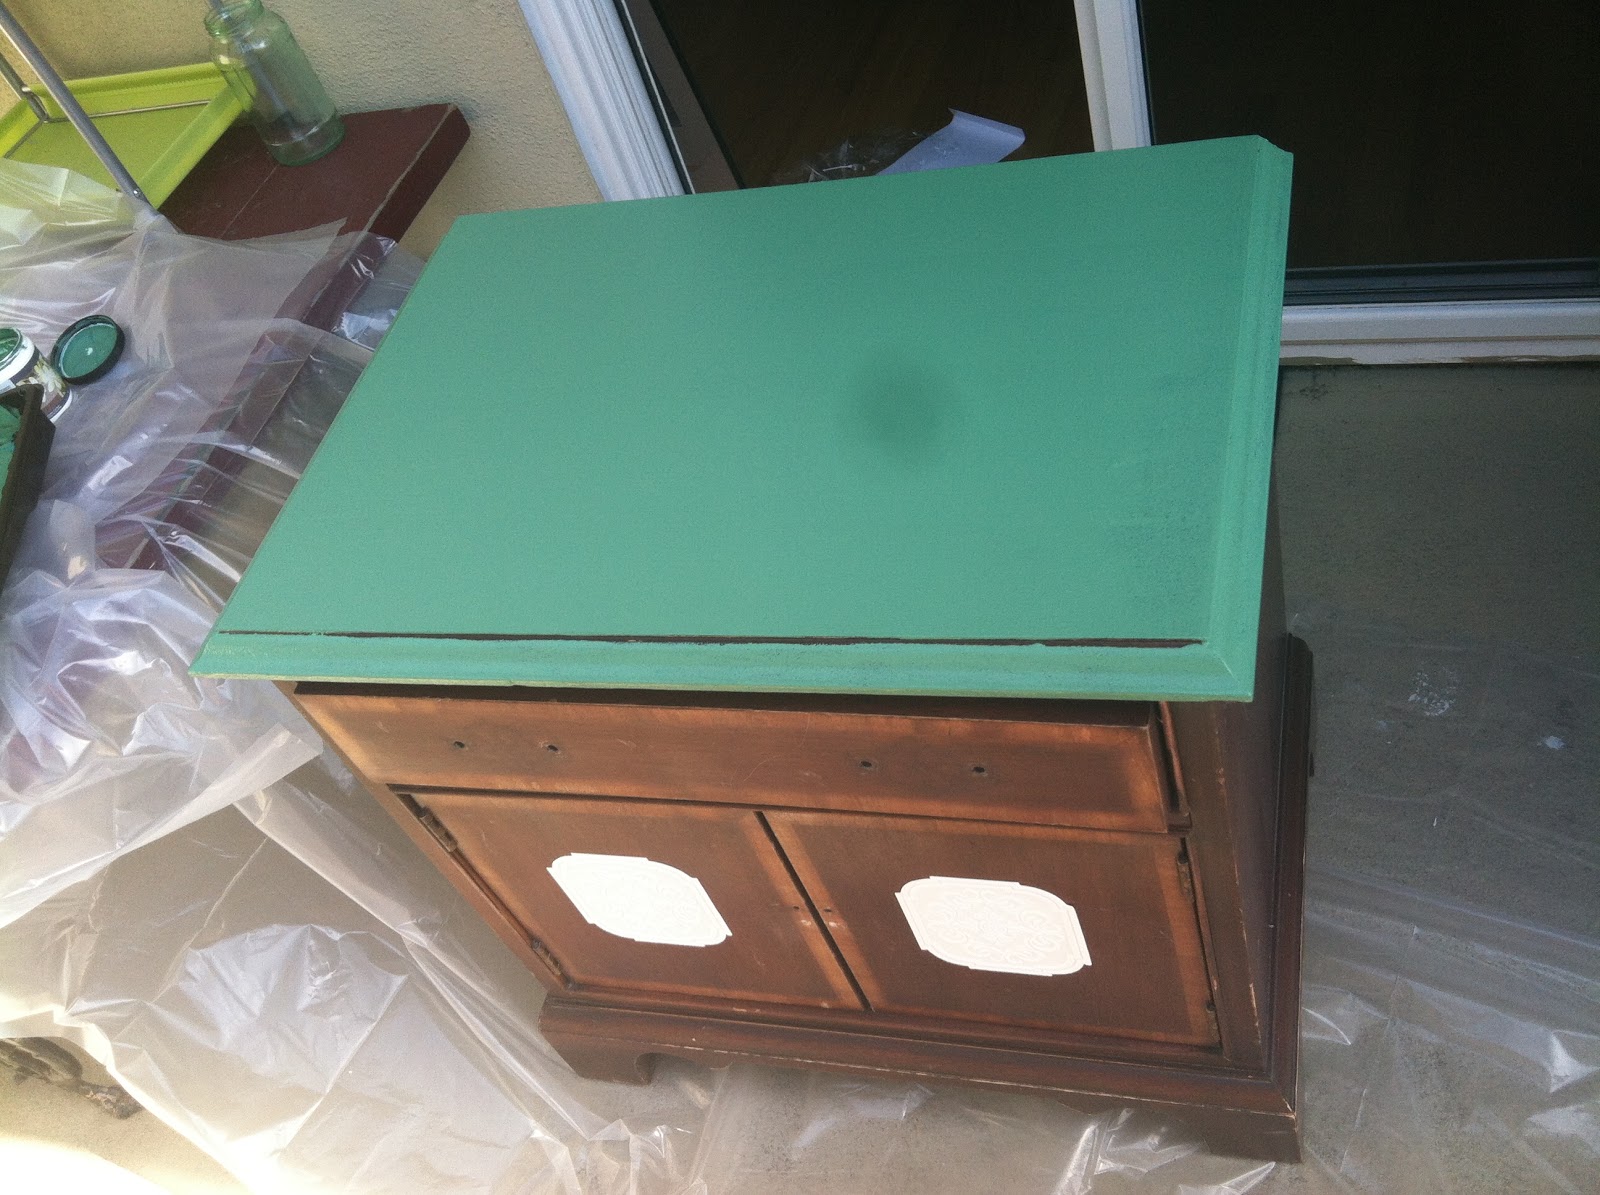
I was given a free end table and I was excited to use the Martha Stewart Interior Paint in the color of Palmetto, which is the same color used on the table above.

The end table was made of particle board and wood laminate. After much research, I decided that I still need to sand it down to get rid of the light gloss coating on top. I wanted the final product to look old and aged, so I lightly sanded the entire table, but then took a hammer and dinged up the edges of the table top, the doors and drawer.


Next, I wanted there to be a little bit more detail in the wood, that didn't currently exist, but that you would normally see in authentic Mediterranean style furniture. I've recently become aware of paintable wallpaper that comes in different patterns. The great thing about paintable wall paper is that the patterns are very similar to some wood work type patterns. I found this roll of paintable wallpaper trim that had a pretty pattern at Lowes (and that is the only store I found it at). I originally bought the trim to use on an Ikea Hack, to put on the drawers of a MALM dresser I have, just to spice it up. I haven't gotten that far yet, and after seeing how easy this project was, maybe I will pick that project back up.


 I cut the center shape out of the wall paper trim, so that I could just give the center of the doors some detail. Like any self stick wall paper, you soak this in luke warm water, fold it onto its sticky self for a few minutes, which will make the glue tacky. 


Once the time is up, you position the wall paper onto the door. It doesn't seem like it will stay on, as it is easily reposition-able and I was worried it wouldn't be strong enough. Once you have the positioning down, just leave it alone for a couple of hours. Sure enough, it will stick.


Then I got to painting! I used a foam roller brush to cover more area quickly. I used a 2" bristle brush to get in all the nooks and crannies.


Once I got the Palmetto paint on ( I did 2 coats overall), I got to mixing my glaze for antiquing. I chose a light brown that I thought would look well with this green to give it just a bit of an "i've been sitting around for a while" aged look, but still be pretty. A lot of people will use an almost black color to age, and it would be more effective and more visible, but I chose for my first ever antiquing glaze to go a bit more subtle. You mix 1 part paint color with 3 parts glaze. I don't remember exactly what brown paint I chose, but I used Behr Faux Glaze for the application.


So, you take your mixture and a bucket of water and a washcloth. You paint on the glaze mixture, as thick or as lightly as you wish. Moments after, you take the wet cloth and wipe it off. As long as you don't press too hard, the glaze will stick in all the small dings and nooks. Go over it as many times as you want. I paid extra attention to the edges and corners, as that would probably naturally have been handled most.  I also lightly brushed all over just to age the paint color itself, but wiped away immediately, and did that over and over until I liked what I saw.


The painted wallpaper looks really great and appears to be part of the doors once all is said and done. There are a lot of small spaces that made it great for the glaze.


Once finished and dry, I re applied the original hardware. I was going to get some fun vintage hardware from Anthropologie, but the dimensions for the original hardware holes were an awkward measurement that most hardware did not match. And the holes for the knobs on the doors were far too close to each other. I didn't feel like filling holes and drilling new ones, and the original hardware looked antique-y enough for me.


VOILA!


Two things to note: I used a spray sealer in order to make it water proof and/or scratch resistant. And it didn't work. I am currently patching the top and I bought a Polyurethane protective water based paint to coat on the top. I got it in a satin finish so that it wasn't glossy and a massively different finish to the rest of it, but a nice finish none the less.

Secondly, If i had done anything else differently, I probably would have liked to maybe cut a strip of paintable wallpaper the length of the drawer, to add some extra detail. Still possible if I decide to up date it. But for now, I am pretty happy with the outcome! :)

Wednesday, April 25, 2012

Making color frosted mason jars!

It is pretty easy. I read about it somewhere online, but can't remember where in order to credit them.

This is all you need to get started:


- A mason jar (mine happens to be a preggo spaghetti sauce jar)
- Food Dye
- Elmers Glue - clear drying (I didn't have it, so I used Mod Podge)
- A cup to mix the glue and dye
- A sponge brush

First you make sure your mason jar is clean and dry. Then you mix whatever color you want into some glue. Doesn't really matter how much. I put enough glue to cover the bottom of the cup, and then added two drops of blue dye and one drop of green and made a pretty teal/aqua color.


Then you just paint the jar! I used up and down stokes in order to not have too many odd streaks.


Don't fret. There WILL be streaks. I allowed it to dry and then applied a second coat in order to cover any streaks.


As it dries it looks more and more frosted, as opposed to painted. Here is the final product:


I think that maybe if I had done 1 more coat it would look better. I can still see some streaks. Or maybe elmers glue would have looked better than the mod podge.  Who knows. Ya live and ya learn!

Go ahead and try your own version!

Monday, March 26, 2012

Oh How Nifty...

My beautiful mother is turning 50! Oh isn't she thrifty. Swifty. Lifty? Whiffty?

*Sigh* What do you say to your mom when she turns the BIG
 
?????????????????????????


She doesn't actually seem to be that sensitive about it, actually. But I can't imagine it's an exciting thing. Better OVER the hill than under it, AMIRIGHT?

Anyway, I don't know. Do I go with the sap? Do I go with the humor? I ask this because I started making a card for my mother and I'm not sure what to fill it with. Words of wisdom? From her daughter nearly half her age? Praaaaahhhhbly not. Sentimental sentiments? Encouraging words? Sure, but what? Any ideas out there?

Here is my card so far (keep in mind, its not finished and I'm allowing for it to dry and what not...)


So I found a pretty, bright paper, and pasted it to the cover, made painters tape stencil letters, and then painted over it in gold. Painters tape as stencils, ...eehhhh... not the most efficient. Paint got under them, and then also stuck to the crafting paper more than I anticipated and tore some of the pretty paper underneath. I also may have peeled the stencils too soon. ANYWHO, a way to fix the text will be my next priority, but for now: What to fill the inside with??

What did you tell your loved one on their 50th birthday? I'm thinking "Happy 50th Birthday Beautiful!" :D


Hailing Hallmark,

DML

Sunday, March 18, 2012

Filing Cabinet Reno

I finally got to one of my quick decor renovations that I've been trying to do, which is covering the front of my filing cabinet, thanks to my inspiration from Fabric Paper Glue (see earlier post Decor Reno in the Meantime).


Here is what it took:


It's very easy to do, and pretty much just took some common sense. I measured the drawer fronts and then cut the paper to size, unscrewed the handles, painted the drawer fronts with the modpodge and applied the paper.  To be safe, I applied another two coats of modpodge on to the paper and door, letting it dry in between coats. Then I sprayed the drawers with a spray sealer and put the handles back on, and ta da! 

A cute, and easy update for a file cabinet that is visible in the middle of my living room! And especially nice to be making something pretty while watching The Walking Dead marathon.


Fabulously Filing,

DML

Friday, March 9, 2012

Decor Reno in the Meantime

Last weekend I posted an Ikea Hacker idea to renovate/update a set of drawers that I have. It turns out, that I haven't had a TON of time to get it started, although I can NOT wait to.

But in the MEAN TIME I came across this file cabinet update that will work perfectly for my smaller do-it-yourself-update itch, since my filing cabinet sits right by our desk in our living room.  In the middle of EVERYTHING. This was originally found on Pinterest, but I wanted to find the original creator and the photo brought me to this really great do it yourself blogger Fabric Paper Glue.


My filing cabinet is two drawers, just like this one, but black. She used a GREAT wallpaper that works so well with the brushed silver of her cabinet. Any ideas where to get cheap but fun wallpaper?? Ideas/brainstorming is what I live for, so send me any thoughts you may have in my comments section!

This is basically what mine looks like:


Making filing pretty,

DML

Sunday, March 4, 2012

Fresh to death

 I just discovered the best thing E.V.E.R: Ikea Hackers

Being a young adult out of college and at the bottom of the ladder in what I am considering a professional career, about 85% of my furniture has been bought from Ikea. As I mature in age and mentality (RIGHT!?) I am starting to get bored of the Ikea look. Everything is too similar. I need more texture, something more to make it reflect my style. The thought of tossing my furniture out (or selling on craigslist) and practically starting over is laughable, because then I will have nothing or be in debt like woah.

Along comes Ikea Hackers. To save me. The smallest changes can make it all your own. One in particular from a blogger (that I just started following because of this) impressed me the most. I have a 4 drawer chest similar, that I want to update.  She posted it on Ikea Hackers, rightfully so and we thank you, but here is her actual blog: California Callahans. Here is what she did with hers:


I love love love the paintable wall paper adding texture and detail to the drawers.  She just inspired me to do something similar with mine. Here is the before picture:


Stay tuned....


Hopefully hacking,

DML


Friday, February 17, 2012

My Stache

It's been a little while since I've remembered that I had a blog I was trying to write in religiously. But I've been hired and so I knew my free time would shrink immensely.

So let me tell you about my craft from last weekend. I almost bought a pig piggy bank for all my loose change (which, let's be serious, isn't all that much really). But then I was inspired by a mason jar - as I so frequently am (you can do ANYTHING with a mason jar, and they just have so much rustic/country charm!!) - that I came across on etsy.com.


Now, I am not a hipster. Really, no where near it. But my boyfriend happens to be fond of mustaches, and men with great mustaches. I think they are funny, and since I love all things 1895, this style of mustache speaks to me, as well. So I thought, "Well now, I could make this for far less than 16 dollars + Shipping." 

Since I work in an art dept for a television show, I have all sorts of craft tools and goods available to me. I found a fun 'stache design online and a font I liked and created my own stencil using Adobe InDesign (Though this could easily be done on word or probably even paint - for you few PC users still out there in the world). I grabbed my handy dandy xacto knife and a cutting mat and carved out my stencil. Over the weekend I found a jar at a goodwill for just a little over a dollar - Score! I planned to use a fun acrylic paint that I already have in my art supply stache (get it? Hope so, thats the whole point of this jar) - which lives in a cluttered mess in a small closet in my small apt (MAN I want a craft room!). 

But then, something magical happened. I found a sticker store! They have so many great sticker finds. Stuff from my childhood that I haven't seen in years, and 3D stickers, and travel stickers for scrapbooking, and alphabet stickers in tons of fonts. I mean, this was sticker heaven. And right in the center of it all, were fuzzy mustache stickers, with real fake hair. My entire direction for my jar changed. Right then and there, I bought those fuzzy sticker mustachios and also a fun puffy bright orange alphabet collection and got to work on my jar. 

Because of the smooth glass surface and the stiff hair follicles of the mustache sticker, I added some extra super glue to it's sticky back, but the letters have held up just fine, and were far too thin to cleanly apply extra glue. If they start to peel off then I may want to add a sealer or some extra adhesive, but I didn't want to jump the gun if it wasn't going to be necessary and jeopardize the clear glass with sticky frosting.

Here she is:


Maybe the original jar is better being more understated letting the play on words alone be funny, and maybe my orange letters and real faux mustache is obnoxious, but I think its funny, and I wanted it to stick out a little bit! And had I painted it, I would have used a maroon red or a teal blue just to give it some color, anyhow. Do what you wish with your crafts, thats the fun part! 

Counting pennies,

DML


Tuesday, January 17, 2012

Vintage Coasters

Over this long weekend, I decided to give myself a small craft. My boyfriend and I have moved in together recently, so I like to also try to incorporate his interests in anything home related. Luckily, we have similar tastes in style.

I had glass drink coasters that I have had for years (since college) that had different terms for being drunk written on them, along with their respective definitions. They were fun,... for a minute. I decided to give them a face lift and cover them with some interesting paper. I am a big fan of Tim Holtz (www.timholtz.com) and his mixed media art products. He has great books of scrap booking and mixed media paper. I purchased one of his booklets and chose a few different prints that were of vintage tickets and bottle caps and pictures, etc.


Super easy project:

*All you need is a sponge brush, mod podge, paper, old coasters or tiles, and a can of sealer.
**If you are using tiles that you buy at a Home Depot or such (which you can get for .11!) you may want to buy felt  to super glue to the bottom of each tile, so that you don't scratch your tables.

-Make sure coaster or tile is clean.

-Cut your paper square about 1/4 inch smaller than the tile you chose for your coaster. The most popular size is 4"x4", and I try to cut my paper as close to 3 3/4" x 3 3/4" as I could.

-Using the sponge brush, paint mod podge onto surface of coaster/tile and place paper on top. Press and squeegee the paper, so that there are no air bubbles, as you want the surface to be as flat as possible when putting a drinking glass on it.

-Paint over the paper and tile using mod podge. You will want to do 3 or 4 layers of this. Wait a good ten minutes in between each layer. NOTE: your strokes should be in the same direction (horizontally or vertically) as the mod podge will dry clear but will give a bit of a lined texture. However, you could switch it up in between each layer to create a hatch mark look.

-Once all of your coasters are dry, take them to a well ventilated area and place them on scrap newspaper. Use the spray concealer as it directs on the can. *Mod Podge is also a sealer, but because this is specifically used for drinks that may perspire, it is just better to be safe than sorry.* Allow to dry over night, and then proudly show them off at your next dinner party!   :)